That sinking feeling when heavy rain starts to fall is something every Okanagan homeowner knows. Your mind immediately goes to the basement, hoping that quiet, out-of-sight hero—your sump pump—is doing its job. But when it starts making strange noises or gets too old, a new question pops up: is replacing a sump pump hard? For many, it’s a totally manageable weekend project that can save money. For others, it can feel like a complex plumbing puzzle with high stakes. This guide is here to help you figure out which camp you’re in. We’ll walk through the tools, skills, and steps required so you can make a confident, informed decision.
Key Takeaways
- Assess Your Skills Before You Start: Replacing a sump pump can be a great DIY project if you're comfortable with basic plumbing and electrical work. Be realistic about your experience to avoid turning a simple swap into a major problem.
- Get the Details Right: A successful replacement comes down to safety and proper sizing. Always turn off the power at the breaker first, and choose a pump that’s powerful enough for your home without being so strong that it short-cycles and wears out early.
- Know When to Call a Professional: If your setup involves rerouting pipes, your electrical wiring isn't up to code, or you simply feel unsure, calling a pro is the smartest move. It ensures the job is done safely and correctly, protecting your home from water damage.
First Things First: What Is a Sump Pump?
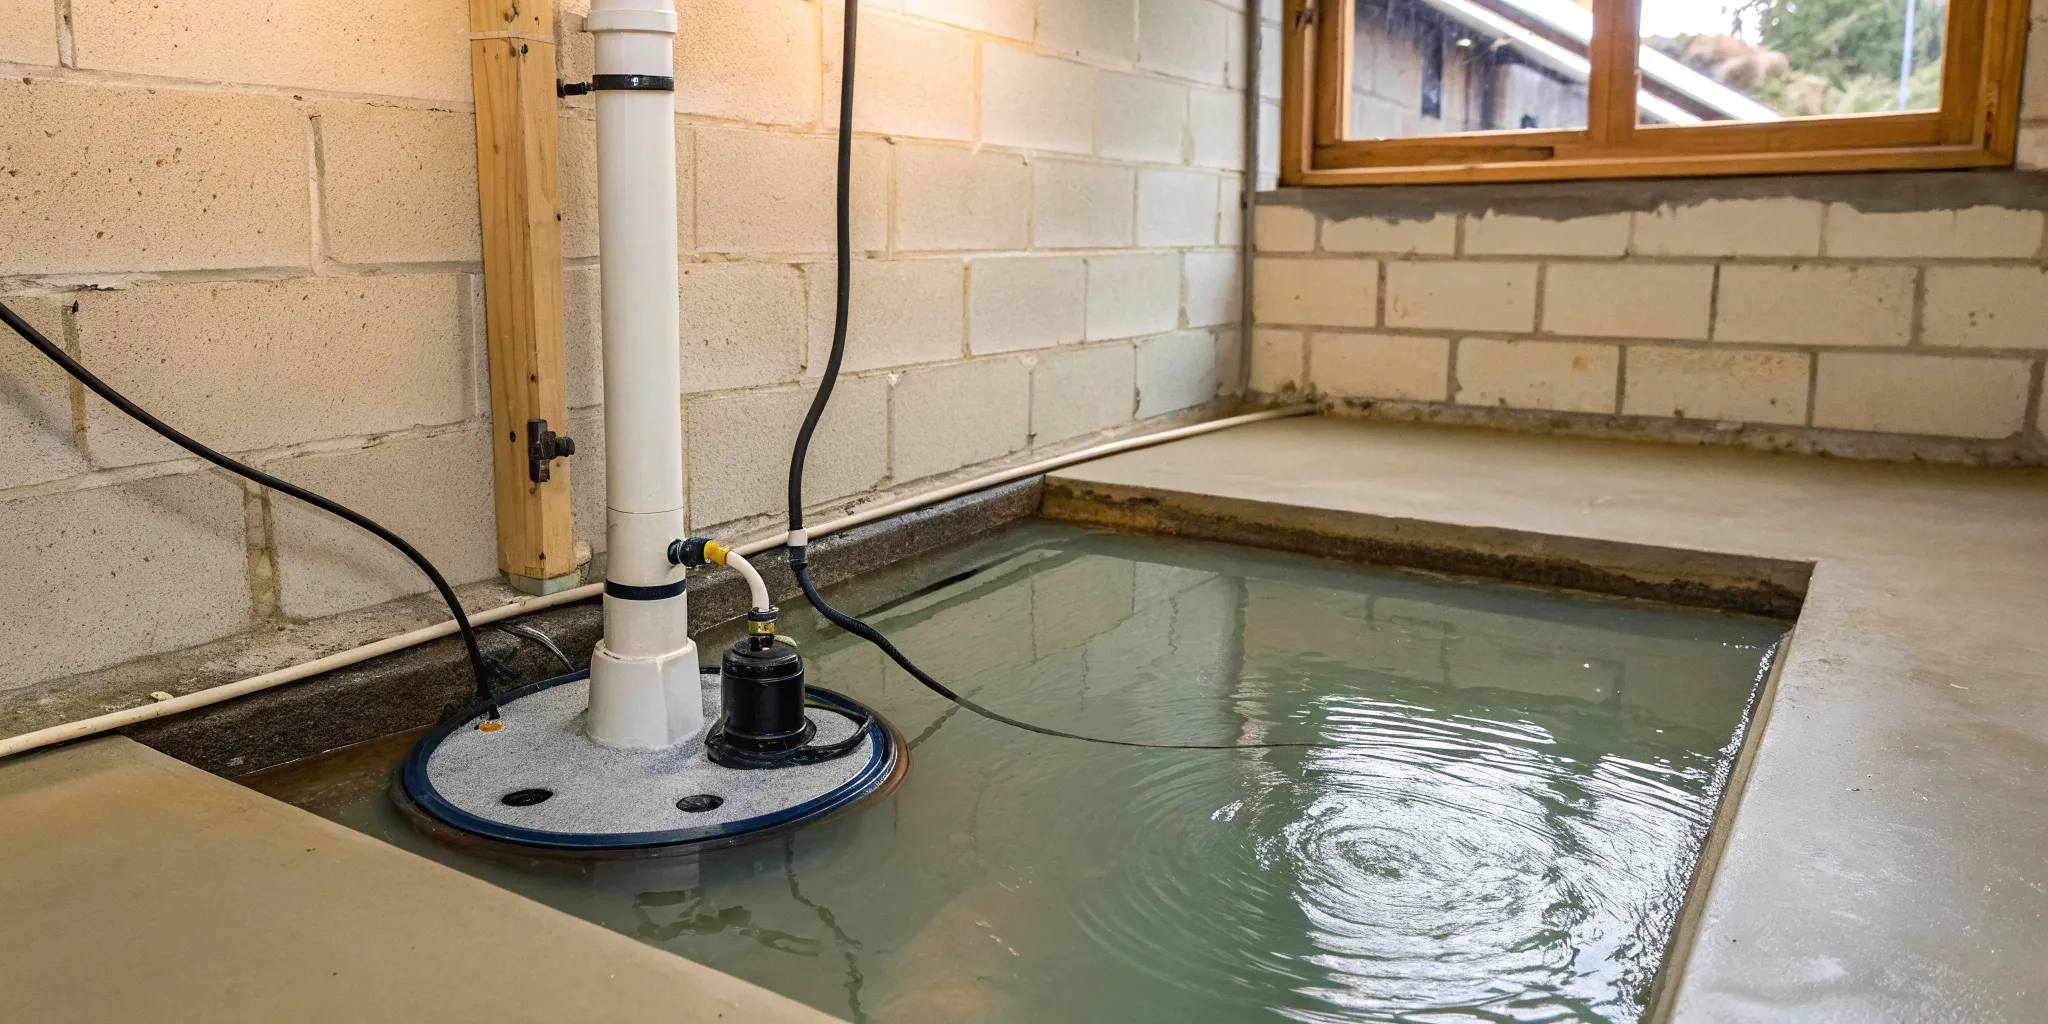
Before we get into the nuts and bolts of replacing one, let's start with the basics. If you've ever wondered about that mysterious pit in the corner of your basement, you're in the right place. That pit is likely home to your sump pump, a small but mighty device that acts as your home's personal bodyguard against flooding. Think of it as an automatic bailer for your foundation. It’s installed in the lowest point of your basement or crawl space, inside a basin called a sump pit. This pit is designed to collect excess groundwater that would otherwise seep into your home. When the water level in the pit rises to a certain point, a float switch activates the pump, which then pushes the water out through a pipe and safely away from your foundation. It’s a simple but brilliant system that works behind the scenes to keep your space dry and protected.
How a Sump Pump Protects Your Basement
A sump pump is your first line of defense against the kind of water damage that causes major headaches and costly plumbing repairs. Here in the Okanagan, with heavy spring melts and occasional downpours, groundwater can easily find its way toward your foundation. Without a working pump, that water can lead to a flooded basement, ruin stored belongings, and create the damp conditions perfect for mold and mildew. By actively removing water before it becomes a problem, a sump pump helps preserve your home's structural integrity and gives you invaluable peace of mind. It’s a critical part of keeping your basement dry and usable year-round.
The Main Types of Sump Pumps
Sump pumps generally come in two main styles: submersible and pedestal. A submersible pump, as the name suggests, sits directly inside the sump pit, fully submerged in water. Because its motor is sealed and underwater, it runs much quieter and is completely out of sight—a great choice for finished basements. A pedestal pump works differently. Its motor sits on a stand above the pit, with a hose running down into the water. While more visible and a bit louder, pedestal pumps are often less expensive and can be easier to service. The right choice really depends on your space, budget, and how you use your basement.
How to Know It's Time for a New Sump Pump
Your sump pump is one of those household heroes that works quietly in the background, protecting your basement from water damage. Because it’s out of sight, it’s easy to forget about—until it stops working during a heavy Okanagan downpour. The key to avoiding a flooded basement and the stress of costly water damage repairs is knowing how to spot trouble before it starts. A failing sump pump rarely gives up without dropping a few hints, and catching them early gives you control over the situation instead of reacting to an emergency.
Learning to recognize the signs of a worn-out pump can save you a major headache and protect your home's value. Some clues are subtle, related to the pump's age and how it operates day-to-day. Others are more obvious red flags that demand immediate attention. By paying attention to its performance and checking on it periodically, you can decide whether a simple repair will do or if it's time for a full replacement. This helps you plan ahead and protect your property, whether you decide to tackle the job yourself or call in a professional for a smooth, worry-free installation that ensures your home stays dry for years to come.
Key Age and Performance Clues
Like any appliance with moving parts, a sump pump has a finite lifespan. Generally, you can expect a quality pump to last about 10 years. If yours is approaching that age, it’s wise to start planning for a replacement, even if it seems to be working fine. Performance issues are another big indicator. A pump that runs constantly, even in dry weather, is working too hard and burning out its motor. On the other hand, a pump that turns on and off too frequently—a problem called short-cycling—could signal a faulty float switch or an improperly sized unit. Unusual noises like rattling or grinding are also clear signs that internal parts are wearing down.
Warning Signs You Can't Ignore
Some symptoms are less about performance and more about clear signs of failure. If you see visible rust on the pump, it’s a sign of corrosion that could lead to a breakdown. A pump that vibrates excessively when it runs is another red flag, often pointing to a damaged impeller. Of course, the most obvious sign is a pump that doesn't turn on at all when it should. If your basement has flooded in the past or you live in an area with a high water table, being proactive about your pump's health is crucial. A reliable system is your best defense, and ignoring these warnings could lead to needing emergency plumbing repairs.
The Big Question: Can You Replace a Sump Pump Yourself?
So, you’ve figured out your sump pump is on its last legs. The next logical question is whether you can tackle the replacement yourself or if it’s time to call in a professional. The short answer is: it depends. For many homeowners, this is a totally doable project that can save you some money and give you a sense of accomplishment. However, it really comes down to your comfort level with basic plumbing and electrical work, the complexity of your current setup, and how much time you have on your hands.
A failed sump pump can lead to a flooded basement, which is a headache no one wants. That's why making an informed decision here is so important. Before you start pulling out your tools, let’s walk through a few key considerations. An honest assessment of your skills, the time required, and the necessary safety precautions will help you decide if this is a DIY job you’re ready to take on. We'll cover what to expect so you can make the best choice for your home and your peace of mind. Making the right choice is the first step to ensuring your Okanagan home stays dry and protected from potential water damage.
Assess Your DIY Skill Level
First, be honest with yourself about your home improvement experience. If you’re comfortable with basic plumbing tasks like cutting and fitting PVC pipes and have a handle on simple electrical safety, you’re likely in a good position to replace your sump pump. Many homeowners on home improvement forums agree that swapping out an old unit for a similar new one is a straightforward job.
However, if the thought of working with water lines and electricity makes you nervous, or if your current system looks complicated, there’s no shame in calling for backup. The goal is a properly functioning pump, and if you’re feeling uncertain, hiring a professional plumber ensures the job is done right.
What to Expect for Time and Effort
The good news is that a standard sump pump replacement isn’t typically an all-weekend affair. For most pedestal or submersible pump swaps where the new unit is a similar model, you can expect the project to take just a few hours. Many guides suggest that a straightforward replacement is an easy job that can often be completed in under an hour.
Of course, this timeline assumes everything goes smoothly. If you need to alter your discharge pipes or troubleshoot unexpected issues, you’ll need to budget more time. It’s always a good idea to start the project on a clear day when no heavy rain is in the forecast, just in case.
Critical Safety Checks
Safety should always be your top priority. Before you even think about reaching into the sump pit, you must disconnect the power to the old pump at the circuit breaker. This eliminates the risk of electric shock while you work. Water and electricity are a dangerous combination, so this step is non-negotiable.
Next, take a few minutes to read the instruction manual for your new pump. It will have specific details about installation and operation that are crucial for proper setup. Finally, remember that a sump pump should always be plugged into its own dedicated GFCI outlet and never be used with an extension cord.
Your DIY Sump Pump Replacement Toolkit
Getting your tools and materials ready before you start is half the battle. It turns a potentially frantic job into a smooth process. Having everything you need within arm’s reach means you can focus on the task without making extra trips to the hardware store. A little preparation ensures you can disconnect the old pump and install the new one efficiently, minimizing the time your basement is without its primary defense against water.
The Essential Tools You'll Need
You don’t need a professional-grade workshop, but a few specific tools are non-negotiable for this project. Before you begin, gather up a drill, a bucket for catching leftover water, and a hacksaw for cutting pipe. You’ll also want to have PVC primer and cement, a new check valve, adjustable pliers, and a pipe wrench. A few zip ties, gloves, and old rags will definitely come in handy for keeping things clean and secure. A Shop-Vac is also great to have for clearing any remaining water from the sump pit, making the whole process much tidier.
A Checklist of Materials and Parts
With your tools ready, let’s talk about the actual parts and prep work. First and most importantly, always disconnect the power to the old pump at the circuit breaker before you do anything else. Safety first! Your new pump needs a solid, level surface to sit on, like bricks or a concrete paver; never place it directly on the dirt or gravel at the bottom of the pit. You’ll also need about 1.5-inch PVC pipe to create the new discharge line. A crucial step is drilling a small "weep hole" in the discharge pipe to prevent air-locking, which can keep your pump from working when you need it most.
How to Choose the Right Replacement Pump
Picking the right pump is critical. It’s not a one-size-fits-all situation, and it’s about matching the pump’s power to your home’s specific needs. Consider how quickly water flows into your basement during a heavy rainstorm. The pump you choose should be powerful enough to handle that volume. You also need to factor in how high the pump has to lift the water and the length of the discharge pipes. For durability, look for pumps with a cast iron body, as they are less likely to crack. Many homeowners find that brands like Zoeller offer a great combination of reliability and long-term performance.
Replacing Your Sump Pump: A Quick Walkthrough
So, you’ve decided to take on the project of replacing your sump pump. For many homeowners, this is a totally manageable job that can save you a bit of money and give you a great sense of accomplishment. The process generally breaks down into three main stages: getting your workspace ready, taking out the old unit, and putting in the new one.
This walkthrough is designed to give you a clear, high-level overview of the steps involved. Think of it as a guide to help you decide if this is a task you feel comfortable tackling. Remember, every home's plumbing setup is a little different, so you should always read your pump's instruction manual for specific details. Let's walk through the process together.
Prep Work and Safety Measures
Before you even think about touching the pump, let’s talk about safety. You’re working with water and electricity in close quarters, so this step is non-negotiable. Your first move is to head to your electrical panel and shut off the breaker that powers your sump pump. Double-check that the power is completely off before you proceed. Next, unplug the old pump from the outlet. Taking a few minutes to get familiar with the new pump’s manual is also a smart move. It will help you understand all the parts and any specific installation requirements, making the whole process go much more smoothly.
How to Remove the Old Unit
With the power safely off, you can start removing the old pump. You’ll need to disconnect it from the discharge pipe, which is usually connected with a fitting called a check valve. You can typically unscrew this by hand or with a wrench. Be prepared for some leftover water to spill out from the pipe and the pump itself—it’s a good idea to have a bucket and some old towels handy to keep things tidy. Once it’s disconnected, lift the old pump out of the sump pit. Before you put the new one in, take a moment to clean any dirt, gravel, or debris from the bottom of the pit. A clean pit helps prevent clogs and ensures your new pump works efficiently.
Installing and Testing Your New Pump
Now for the final step: installing your new pump. Gently lower it into the clean pit, making sure it sits level and that the float switch can move up and down without hitting the sides of the basin. Reconnect the discharge pipe to the new pump, ensuring the check valve is installed correctly so water can flow out but not back in. Once everything is connected, you can plug the pump in and restore power at the breaker. The most important part is testing it. Pour a few buckets of water into the pit until the float switch rises and activates the pump. Watch to make sure it turns on, pumps the water out, and shuts off correctly. This simple test gives you peace of mind that your home is protected. If you run into any issues, professional plumbing repairs are always an option.
Common DIY Mistakes to Avoid
Replacing a sump pump can feel like a straightforward weekend project, but a few common missteps can quickly turn it into a major headache. Knowing what to watch out for ahead of time can save you from a flooded basement, electrical hazards, or a pump that quits when you need it most. Let's walk through the most frequent mistakes so you can get the job done right the first time and protect your home.
Electrical and Plumbing Pitfalls
Your absolute first step, before you even touch the pump, is to cut the power. Find the circuit breaker that controls the sump pump and switch it off to prevent any risk of electric shock. A common mistake is using an extension cord as a permanent solution. Your sump pump is a critical piece of equipment and should always be plugged directly into a GFCI (ground-fault circuit interrupter) outlet on its own dedicated circuit. This prevents overloading and reduces fire risk, ensuring the pump has the reliable power it needs during a storm. For more information on home electrical safety, you can review guidelines from trusted safety organizations.
Sizing and Installation Goofs
Choosing the wrong size pump is a frequent and costly error. A pump that’s too powerful will turn on and off constantly—a process called short-cycling—which wears out the motor prematurely. A pump that’s too weak won’t be able to keep up with heavy water flow, leading to a flooded basement. You also need to ensure the sump pit itself is the right size. The basin should be wide and deep enough for the float switch to move freely without getting stuck on the sides. If the float can’t operate correctly, the pump won’t know when to turn on, defeating its entire purpose.
Preventing Water Damage During the Swap
Even after it’s turned off, your old sump pump and the discharge pipe are still holding water. A common oversight is forgetting to account for this leftover water, which can lead to a messy spill all over your basement floor. Before you disconnect the old unit, have a bucket and some old towels ready. A wet-dry vacuum is also incredibly helpful for clearing out any remaining water from the bottom of the pit. If you happen to notice other leaks or pipe issues during the process, it might be a sign of a larger problem that needs professional attention. Our team is always ready to help with any plumbing repairs you might uncover.
When Should You Call a Professional Instead?
While a straightforward sump pump swap can be a satisfying DIY project, it’s smart to know when a situation calls for a professional. Recognizing your limits can save you from a flooded basement, costly mistakes, and serious safety hazards. If you find yourself hesitating, it’s always better to trust your gut. A project that seems simple on the surface can have hidden complexities that only a trained eye can spot. Calling in an expert isn’t giving up—it’s making a strategic choice to protect your home and your peace of mind.
Signs Your Setup Is Too Complex
Take a good look at your current sump pump system. If it’s more than just a pump sitting in a basin, you might be looking at a job for a pro. For instance, if the PVC discharge pipes need to be cut, re-routed, or replaced, you’ll need some basic plumbing skills to ensure a leak-proof fit. Does the sump pit itself look cracked or need to be enlarged? That moves the project into light construction territory. If you’re not completely comfortable with the process or the complexity of your setup, it’s wise to get professional plumbing repairs. A plumber can also diagnose related issues, like a clogged discharge line that needs clearing.
When to Defer to Safety and Code Requirements
This is the most important factor. Water and electricity are a dangerous combination, and there’s no room for error. Before you even think about touching the pump, you must turn off the power at the circuit breaker. A sump pump should always be plugged into a dedicated GFCI (ground fault circuit interrupter) outlet and never, ever be used with an extension cord. If your electrical setup doesn't meet these standards, stop right there. Professionals, like the Red Seal Plumbers at TruFinity, understand local building codes and safety protocols inside and out. They ensure your installation is not only effective but also completely safe for your family.
How Much Does Sump Pump Replacement Cost?
Let's talk numbers. The cost of replacing a sump pump is often the deciding factor for homeowners weighing a DIY project against calling in a pro. While tackling it yourself can save you money on labor, it's important to have a clear picture of the total investment for both routes. The final price tag depends on the type of pump you choose, the complexity of your setup, and local labor rates. Understanding these costs upfront helps you make a smart decision for your home and your budget, ensuring you don't face any surprises along the way. Whether you're buying the parts yourself or getting a quote from a professional, knowing the breakdown is key.
A Look at DIY vs. Professional Costs
If you decide to replace the sump pump yourself, your main expense will be the new unit and any necessary supplies like PVC pipe or cement. A reliable sump pump and a battery backup system can cost between $500 and $1,000. This is a significant saving compared to some professional quotes, which can sometimes exceed $3,000 for complex installations.
However, a professional replacement often falls in a more moderate range. The average cost is typically between $300 and $750 for a standard swap-out. This price includes the new pump, the plumber's time and expertise, and the peace of mind that comes with a warranty. If the cost feels like a stretch, many companies offer financing options to help manage the expense without delay.
What Factors Influence the Price
The final bill for a sump pump replacement isn't just one number—it's a combination of a few key factors. First is the cost of the pump itself. A basic pedestal pump will be less expensive than a heavy-duty, cast-iron submersible model with a higher horsepower rating. Adding features like a battery backup system or a smart alarm will also increase the material cost.
Labor is the other major component. Professional plumbers typically charge between $45 and $200 per hour. While a simple replacement might only take an hour, more complex jobs that require new piping or adjustments to the sump pit will take longer. When you hire a professional for plumbing repairs, you're paying for their experience, efficiency, and the guarantee that the job is done right and up to code.
Keep Your New Sump Pump Running Smoothly
Once your new sump pump is installed, you’re well on your way to a drier, more protected basement. But the work doesn’t stop there. A little bit of regular maintenance is the best way to ensure your pump works when you need it most, preventing that feeling of emergency anxiety during the next big storm. Taking a few minutes every few months to check on your system can extend its life and give you confidence that your home is secure. Think of it as simple preventative care that protects your investment and your peace of mind. It's about staying ahead of potential problems so you can relax, knowing your home is ready for whatever the weather brings.
Simple Maintenance You Can Do
You don’t need to be a plumbing expert to keep your sump pump in good shape. A few simple checks a few times a year can make all the difference. First, make sure the pump is sitting upright, as vibrations can sometimes cause it to tilt and jam the float switch. Every three to four months, test the pump by pouring a bucket of water into the sump pit. You want to see it turn on, remove the water, and shut off properly. It’s also a good idea to unplug the pump and clean the intake screen to remove any small stones or debris that could cause a clog.
Getting Ready for the Seasons
Your sump pump works hardest during specific times of the year, like the spring thaw or after a heavy rainfall. Before the wet season arrives, it’s the perfect time to give your system a quick test run. For extra protection, especially during storms that can knock out the power, you might consider adding a battery backup. Some homeowners also install a sump pump alarm that can send an alert to their phone if the water level gets too high. These combination sump pump systems provide an essential safety net. If you’d rather have an expert handle these seasonal checks, our TruLoyalty Membership includes annual plumbing evaluations to keep everything running perfectly.
Related Articles
Frequently Asked Questions
How long should a sump pump typically last? On average, you can expect a quality sump pump to last for about 10 years. However, this isn't a hard and fast rule. A pump in a home with a high water table that runs frequently will likely wear out faster than one in a drier area that only kicks on a few times a year. If your pump is nearing the decade mark, it’s a good idea to start planning for a replacement rather than waiting for it to fail during a storm.
My pump seems to be running all the time. Does it need to be replaced? A pump that runs constantly is definitely a red flag, but it doesn't automatically mean the motor is shot. This issue can be caused by a few things. It could be a stuck float switch tricking the pump into thinking the pit is always full. It might also mean the check valve has failed, allowing water to flow back into the pit after it's pumped out. In some cases, the pump may simply be too small to handle the amount of incoming water. It's a problem that needs attention, as the constant use will burn out the motor prematurely.
What's the biggest mistake people make when replacing their own sump pump? The most critical and dangerous mistake is forgetting to disconnect the power at the circuit breaker before starting work. Water and electricity are a hazardous mix, and this safety step is non-negotiable. Another common error is choosing the wrong size pump. Picking a unit that's too powerful will cause it to turn on and off constantly, wearing it out quickly, while one that's too weak won't be able to protect your basement during a heavy downpour.
What happens if the power goes out during a storm? Will my new pump still work? A standard sump pump relies on your home's electricity, so it will not work during a power outage. This is the pump's biggest vulnerability, as heavy storms are often when you need it most. For complete protection and peace of mind, the best solution is to install a combination system that includes a battery backup pump. This secondary pump will automatically take over if the power fails, ensuring your basement stays dry.
Is it better to get the same model pump or upgrade to something different? If your old pump did a good job for years, getting a similar model is often the simplest path for a DIY replacement. However, a replacement is also a great opportunity to assess your needs. If you've recently finished your basement or have noticed more water than in the past, you might consider upgrading to a more powerful model or one made from more durable materials like cast iron. This is your chance to choose a pump that perfectly matches your home's current needs.


.webp)